How to Make a Self Propelled Car Using a Balloon
Balloon-Powered Race Car – Science Experiment
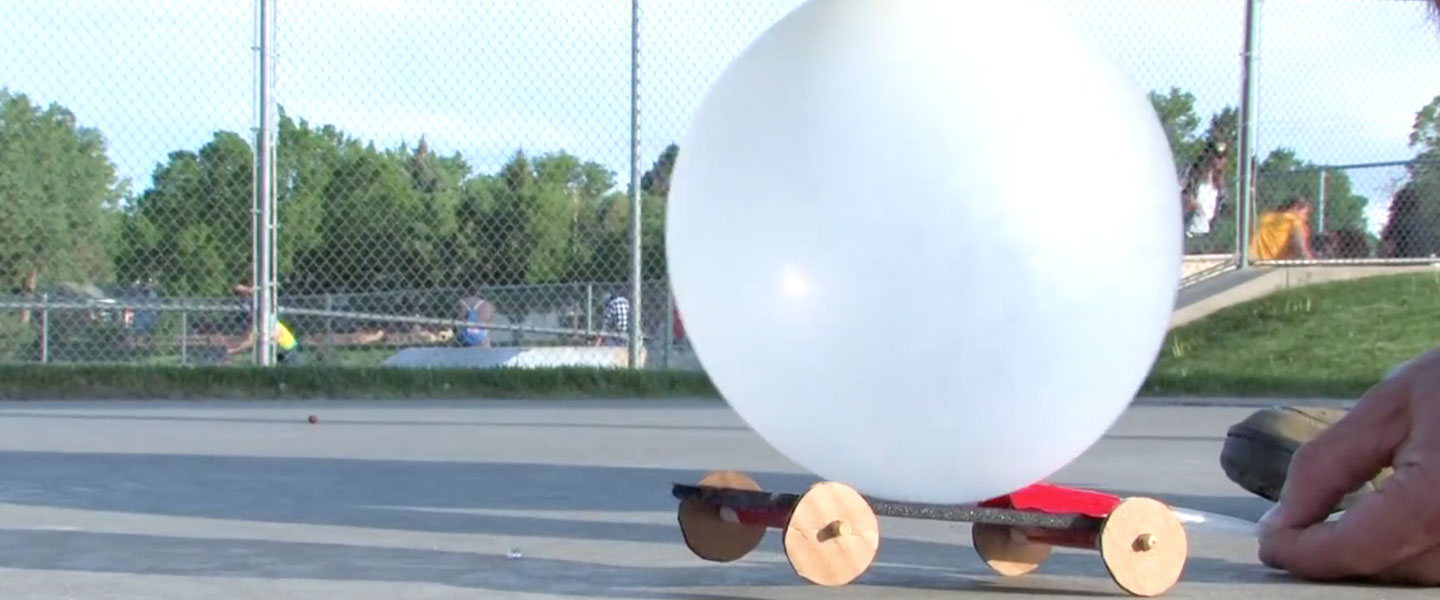
Air pressure powers a homemade racer across the floor.
Looking for the best balloon-powered car instructions? You've found 'em! Learn how air pressure powers a homemade racer across the floor.
When it comes to powering a race car, there are a lot of different options. Some cars use gasoline or diesel fuel; others use rocket fuel or another kind of combustible material. Some have even used solar power to charge batteries! At home, you can power a miniature race car with a rubber band or a mousetrap (not recommended — ouch!). In this Steve Spangler Science Balloon-Powered Race Car Experiment, we'll give you step-by-step instructions on how you can build your own race car and then use air pressure to zip it across a surface. Experience firsthand what happens to the car as you release the air inside the balloon. How fast will it go? Will it even move at all? This balloon car experiment will have you asking many, many questions about potential energy, gravity and Newton's Laws of Physics.
SICK Science® is a registered trademark of Steve Spangler, Inc. All Rights Reserved.
Experiment Materials
- Foam core (See Step 2.), 3 x 6" (7.5 x 15 cm)
- Wooden Wooden food skewer, 12" (30 cm) long skewers
- Regular cardboard
- 2 Straws
- Strong tape (like duct tape)
- 10" (25 cm) Balloon
- Scissors
- Lid from a 2L bottle
- Pencil
- Ruler
Experiment Videos
Experiment

1
Use the ruler to measure two, 3" (8 cm) pieces from one of the straws. Grab the scissors and cut the two pieces from the straw. These pieces will hold the axles of your car.

2
You have some choices to use for the frame or base of your car. One is very rigid cardboard that holds its shape well. Another is called foam core. It's also rigid and light weight. It's available in most school or business aisles of grocery stores and pharmacies as well as at any business supply store. It's a foam material sandwiched between very stiff paper. It's not too expensive and you'll need only a single piece. It comes in colors, too, so be choosy.
Cut out your base material so that it measures about 3 x 6" (7.5 x 15 cm).
Securely tape the two straws you just cut to the underside of the base. Since they hold the axles, the straws need to be as parallel to each other and as perpendicular to the centerline of the base as possible.

3
Almost all balloons have a mouthpiece on them that you blow through to inflate them. Use the scissors to trim this ring off of the balloon. The goal is to insure a tight seal to the straw in the next Step.

4
Slide the straw into the balloon about 2" (5 cm) and use tape to make it an airtight connection. The tape needs to touch both the balloon and the straw for a couple of tight, spiral wraps.

5
Turn the base so the straws are on the bottom and decide which end will be the front and which will be the rear of your car. You want to place the straw toward the rear of the car and the balloon toward the front in about the center of the base. The straw sticks way out of the back and it needs to be as straight as you can make it. Securely tape the straw in place over the tape already on it from Step 4.

6
From the flat end (not the pointy end) of the skewer, measure two 4" (10 cm) lengths. With the scissors or a small saw, cut the measured lengths. These are the axles for your car. Save the pointy end for the next Step. Slide the new axles into the straws on the base.

7
Use the soda bottle cap to trace four circles on the cardboard. These will be the wheels for your car so draw them carefully. Use the ruler to draw two diameters on each wheel. You need to know where to find the center of each. Cutting out the wheels is as important as having parallel axles so take your time. Use the best tool you have to make them the same size and as evenly round as you can.
Use the pointy end of the skewer to poke a small hole through the very center of each wheel. That would be where the two diameter lines cross.

8
Attach the perfectly round wheels to the perfectly parallel axles through the perfectly centered holes. Keep the wheels perfectly parallel to and aligned perfectly with each other, too. Perfect! OK, that was a little much but the alliteration was fun. Just do your best and enjoy yourself as well.
This is the power moment! Go to your preferred track location (any hard surface works) and fuel your racer with potential energy by inflating the balloon. Block or pinch the straw as you set up on the start point and then release it when you're ready to roll. Potential energy converts to kinetic energy, Newton's Third Law of Motion kicks in, and your racer screams down the track!
How Does It Work
The concept behind the Balloon-Powered Race Car Science Experiment is pretty simple. That doesn't make it any less impressive, though!
When you blow up a balloon, set your racer down and then let it go, the escaping air from the balloon rushes out of the straw. This is your car's propulsion system. As briefly mentioned in Step 8 below, the principle at work is Newton's Third Law of Motion. This law states that for every action, there is an equal but opposite reaction. In the case of the balloon-powered race car, the action is the air rushing from the straw and pushing against the air behind the car. The reaction is the air behind the car pushing against the car with the same force, causing the forward movement of the car.
The potential energy of the car is stored in the expanding elastic material of the balloon. As the balloon fills with air, it adds more potential energy — or stored energy. As the air flows from the balloon, the energy changes to kinetic energy (or the energy of motion). The moving balloon-powered car uses kinetic energy. If you aim your car down a ramp from the top of the ramp, just lifting it up into that position adds potential energy, thanks to gravity. Upon release, the potential energy converts to kinetic energy and the car goes until there's not enough energy to move it anymore.
The first part of Step 8 was in fun, but the points are correct: the rounder the wheels, the better. The parallel axles and wheels mean that the car will travel in a straight line. It will not veer one way or the other, losing energy while doing so. Centering the wheel on the axle means that it rolls evenly without a wobble and/or without an up and down movement. This would (you guessed it) eat up any energy that could go to speed. Wow! There's a lot packed into this simple design.
Take It Further
There are a ton of things you can do to personalize and perform more research into this balloon car experiment. A few ideas to customize or modify this balloon-powered race car experiment are:
- Creating fun designs and colors on your car to really make it your own
- Changing the size of the wheels to determine how the wheel's size (and alignment) might affect the distance and direction your car travels
- Using four lids for wheels instead of cutting out your own wheels
- Trimming the propulsion straw or testing different sizes to see which exhaust system supplies the most thrust
- Testing different balloons and straws to find the ideal combination for the best speed (speed = distance divided by time)
Voila! You have the perfect tool to confirm that Newton's Laws of Motion are, in fact, correct. You can easily alter the car for multiple other exciting tests and further experiment with what happens to the car as you release the air inside the balloon.
The Best Balloon-Powered Car Experiments — and More
Love this balloon-powered race car experiment? We have a ton more science experiments to explore. Check out the Steve Spangler Science online experiment library for awesome science experiments for kids, including our top five science experiments on our comprehensive website. For other fun and easy balloon experiments, don't miss our Screaming Balloon Experiment, Balloon Skewer or Balloon Expansion experiment. Each experiment demonstrates a principle of science in a way that is entertaining, engaging and hands on. Don't miss our all-in-one science kits, too, for great after-school activities, spring break activities or summertime slump activities that will get them thinking about science.
How to Make a Self Propelled Car Using a Balloon
Source: https://www.stevespanglerscience.com/lab/experiments/balloon-powered-race-car/